

Search Knowledge Base by Keyword
-
Getting Started
-
-
- Articles coming soon
- Server Last Update Element
- Add URL's to Ignore and Exclude
- Enable or Disable Canonical Checking
- Enable or Disable Forced Lower Case
- Enable or Disable Robots Checking
- Root Domain - Set URL for HREFLang XML Server Location
- Set URL's to Include in XML
- Set/Change Exported XML File Size
- Setting X-Default Language
- Enable or Disable URL Checking
- Error Checking Options
- Enable Mapping Tag Names
- Disable or Enable HTTPS Checking
- Disable or Enable Strip index.html in URLs
- Select User Agent
- Enable Custom Index XML File Name
- Auto Uploading XML Files
- Set URL for HREFLang XML Server Location
- Setting Global File Name Prefix – XML Site Maps
- Set Export Type
- Show all articles ( 5 ) Collapse Articles
-
-
-
Managing Projects
-
- Import Individual Excel or CSV files for each country/language
- Import Individual Sitemaps for each country/language
- Importing Blended (Multiple Country Version) XML Site Map(s)
- Importing Multiple XML Index Site Maps
- Importing Multiple XML Site Map(s)
- Importing XML Index Site Map(s)
- Importing Zipped XML Index Site Map(s)
- Append New URL's to Existing Country
- How to Delete or Exclude URLs
- How to Add URLs to a Country
- 200 Indexable URLs
-
- AllowList HREFLang Builder
- Auto Import XML Sitemaps from Dropbox
- Screaming Frog for URL Auto Updates
- HREFLang Builder Bot
- Use Auto Update to Add New URL's
- Setting up Lumar (FormerlyDeep Crawl) API
- Lumar (DeepCrawl) API Considerations
- Setting up OnCrawl API
- Auto Uploading XML Files
- Setting up AWS S3 Bucket for XML Site Maps
- How to Add New URLs to Hreflang Builder
- Setting up Content King API
-
- Mapping Different Page Names
- My Local Country Site is in English
- Using Missing Page Identification Feature
- How do I upload a custom URL mapping table?
- How To Map Alternate URLs
- Mapping URL's with Product ID's
- How do I download my custom URL mapping table?
- Building a Manual Mapping Matrix
- Image Sitemap Extraction for Product Mapping
-
- Adding a new site to an existing project
- Editing Existing Projects
- Editing the Country or Language of a Site
- Import Individual Sitemaps for each country/language
- Reviewing the Update Status Report
- Setting a Global Language
- Setting or Changing the Country or Language
- What happens once my HREFlang XML is created?
- Setup Automatic Updates
- HREFLang for Regional Sites
- AllowList HREFLang Builder
- How to Remove a Country or Language Clone
- How to Clone a Country or Language
- How to Clone a Country or Language for X-default
- Removing a Country or Language
-
-
Best Practices
- Duplicate URL's used in HREFLang Elements
- How do I Add a New Country or Language Version to an existing project
- I have localized URL's can I use HREFLang Builder?
- What are the red rows in my project?
- Why are some URLs missing from my XML?
- How do I Add or Replace URL's for a country?
- Can I use a global language like French?
- What are the red rows in my project?
- Finding Included URLs
-
Troubleshooting & Errors
- Consistent URL Counts
- Downloading Non-200 Indexable Status Error Reports
- Using Missing Page Identification Feature
- Why is my country file missing?
- My Project is all Red
- Find URL Source Files
- Why do I have an Unknown_Unknown_csv File
- URL is Redirecting to Error
- Country and Language Mismatch
- Multiple Tags for this Language-Region Code
- Status 0 Code
- Finding Included URLs
-
HREFLang Basics
- Are HREFLang Statements Case Sensitive?
- Can HREFlang Builder be used cross domain?
- Does HREFLang URL Order Matter?
- Does the URL order matter for HREFLang elements?
- HREFLang for Regional Sites
- When to use HREFLang Elements?
- What is the HREFLang Element?
- Using Canonicals and HREFLang Tags Together
- How to Rebuild or Update HREFLang XML Site Maps
-
HREFLang Mistakes
- Error - Canonical is Self-referencing HREFLang Entry
- Error - Combining HREFLang and Canonical Tags
- Error - Combining Multiple Country or language codes
- Error - HREFLang only on Dot Com Domains
- Error - HREFLang Only on Home Page
- HREFLang Return Tags are Missing
- Mistake - Canonical Mismatch Errors
- Mistake - Incorrect Country or Language Codes
- Mistake - Too Many HREFLang Elements in a Page
- Mistake - Uploading URL's with Errors
- Mistake - Using Protocol-Relative URL's in HREFLang Tags
- Return Tags Not Matching Self-Referencing Values
-
HREFLang Builder General
-
Reports
-
Features
Import Individual Sitemaps for each country/language
If you have individual XML sitemaps for each country, you can add them via the Auto Update function that is available from the main heading. This function should have already been set up when the project was created. You can update the sources at any time.
Step 1 – Click Auto Updates
You will see “Auto Update” from the main header. Click this link to open the Auto Update Management screen.

Step 2 – Click the Sitemaps Tab
If you are adding XML sitemaps, click the Sitemaps tab to open the sitemaps box. If you are adding an XML SItemap Index file, click that tab and go to Step 3.
Step 3 – Paste Sitemaps
Paste any new XML sitemaps into the box. Add one XML sitemap per row. If you need to remove an old source files, simply delete them from the box. When you add sitemap files from Dropbox, ensure you change the ending extension from -0 to -1. Then go to Step 4.
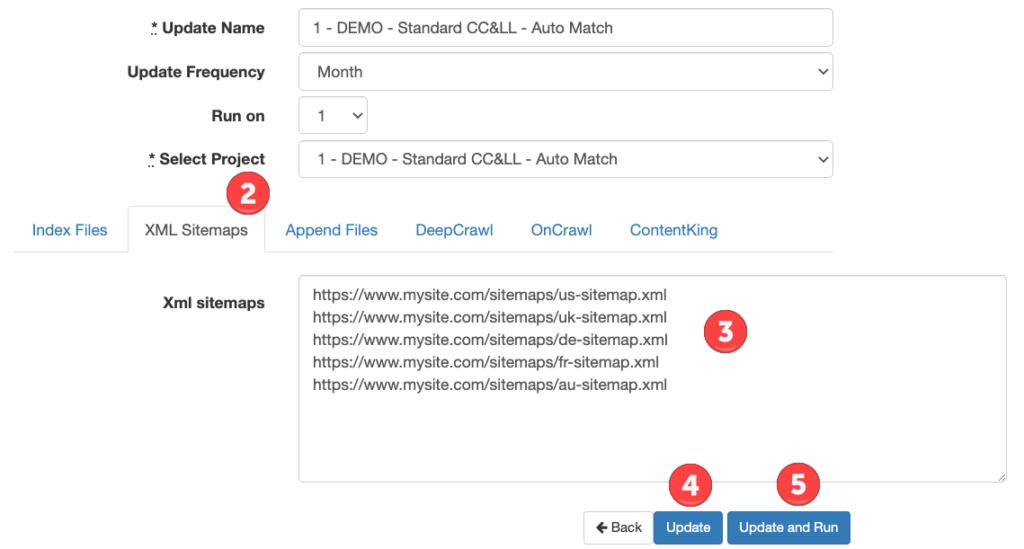
Step 4 – Import and/or Update the Project
There are two options once you have added your new XML sitemaps to the field.
Option 1 – Add to Import Update (Don’t Update Project)
With this option, you can add or remove XML sitemaps and save them to the import process. It will save the new sitemap XML URLs and import them during the next scheduled update. This option is good if the project does not need to be updated.
Action: Click the blue UPDATE button at the bottom to add the link(s) and files to the import system. You can always manually run them using the “Run” option on the main Auto Update screen.
Option 2 – Import/Add XML Sitemaps and Rebuild Now
With this option, you will save the XML sitemap URLs to the system AND rebuild the project. This step will trigger the system to go to each XML sitemap and import them.
Action: Click the blue “Update and Run” button to start the import and rebuild process.