

Search Knowledge Base by Keyword
Adding a new site to an existing project
You can easily add a new site or language version to your project by simply adding the URLs through the Auto-Update functionality. You can follow the following steps.
Step 1 – Open AutoUpdate Screen
From the main screen header you will see “Auto Update” click this link to open the Auto Update Management screen.

Step 2 – Adding New URL Source File(s)
For this step, you will add the source file to the project depending on the type of import source. Click the tab for the type(s) of files you are importing.
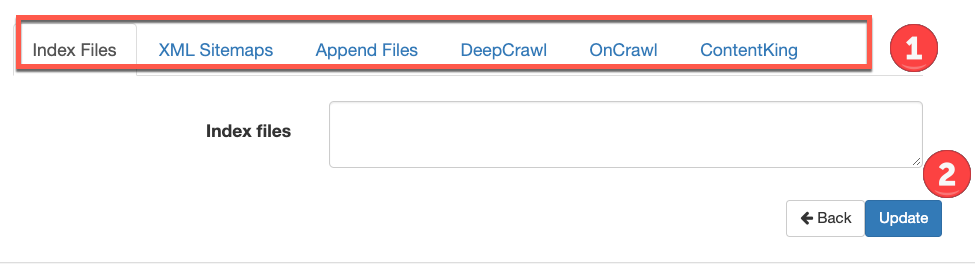
Option 1 – XML Sitemap Index File(s)
The easiest and preferred method is to simply add the new XML sitemap for the new addition to your existing XML Site Map Index file. Once this has been added and you refresh your project, we will automatically import the new source file. With the sitemap index option, we import all XML sitemaps listed in the source index file. Anytime in the future, we will automatically import and try to identify the format of the new site. If the new market is large it may itself have an index file that should be submitted.
Option 2 – XML Sitemap from Site
If you are not using an If you have a live XML site map for this country/language simply paste it into the box for XML Site Map URL and we will fetch the file and import the URLs.
Option 3 – Import CSV or Excel File from Computer
If you have a CSV/Excel file with all of the new URLs you can simply append that file(s) and we will import the new URLs. Note: It is best to use a more dynamic source for URLs to ensure they are always refreshed but this is a great way to set up the new market while you are waiting for the XML source or SEO Diagnostic tool to be set up.
Option 4 – SEO Diagnostic Tools API
If you are currently using or want to use your SEO Diagnostic tool to import this new site you just need to set it up in that system. Once live in the SEO Tool, follow the steps for each tool below to add the new market to the API connection.
Once you have added the source file(s) you need to click the blue Update button to add them to the project. Note this does not rebuild the sitemap it only adds these sources to the Auto Run system for import.
Step 3 – Run the Project to Import and Update Project
If you are ready to rebuild the project and import the new source files click the green RUN button to start the process.

Step 4 – Edit Country and Language
If the new site deviates from the format of the exiting sites in the project you may need to set both the country and language as the system will not understand what they should be. This will be represented by a red highlighting of the new source file entry in the system. You can set this using these steps.
Step 1 – For the new entry that is highlighted in red, click the “Edit File” option for that entry
Step 2 – In the Country Language Selector, click the pull-down and select the X-Default option
Step 3 – Click the Blue up or down arrows to go to the top or bottom of the page and click update. This will set the language and country and rebuild the project. Once this is done it is set and will require no further action.